This seems to be too big a project to take on right now. So at the moment, I am going in for off-the-shelf decoders. To start with, I installed a DCC decoder in a Fleischmann steam loco.
I used a Lenz 101US decoder. The Fleischmann 4019 is a 0-6-0 steam loco. On the underside of the loco, there are two screws - one black and one silver. The plastic body of the loco ia held to the frame with the black screw. Unscrew the black screw and gently separate the body and the frame. The heavy black object that suddenly lands on your lap is the weight. The front half of the inside of the loco is almost completely filled with this weight. At the back a flat, round motor fills most of the cab. There are two spaces - one above the motor and one behind it. I bought the decoder with the DCC connector because the one without it was out of stock. But now that I have a connector I decided to use it. I made a socket by cutting two SIL strips four holes long and 'welding' them together with a soldering iron. The SIL socket I happened to have is a little tall and the connector is a little bulky. SIL strips with a lower profile would be an improvement. I then soldered wires to the DCC socket.
I used coloured wires as per the DCC RP. The left side wheels are connected to the frame. At the lower end of the motor, a connection from the frame is soldered to one terminal of the motor. This is very thoughtful of the the designers as it is easy to separate the two with a dab of the soldering iron. The red plastic frame which covers this area has to be pushed away from the connection to reach it. The small silver screw on the underside has to be removed to do this.The right side wheels are connected to the motor with a black wire. Disconnect this wire at the motor.
The DCC socket is placed in the space behind the motor and the decoder goes above the motor. Put the DCC socket in position and trim the wires to the right size. The red wire from the socket is connected to the black wire from the loco. Put a bit of heatshrink sleeve on the connection to insulate it. tuck it away where the weight does not interfere with it. The black wire from the socket goes to the frame connection at the lowere end of the motor. The orange and grey wires go to the top and bottom motor connections respectively. The wires to the socket should be kept as short as possible and kept on the side of the motor opposite to the gear train to avoid fouling the gear drive.
The DCC decoder fits above the motor in the cab. Inside the roof of the cab, a strip of plastic is visible which probably serves to strengthen the roof. I spent some time trying to mill out a spce for the decoder before realising that it was just a plastic strip attached at either end and not solid plastic moulded into the roof. So all you have to do is to cut each end and the strip falls out. This gives us enough space to install the decoder.
The top of the motor is insulated by putting two layers of electrician's tape cut a little wider and the edges folded over the motor. The decoder usually has a piece of black heatshrunk sleeve covering half of it but I had cut it off the day I bought the decoder to see what's under it!
Once the decoder has been placed inside the roof with the length perpendicular to the axis of the loco, it is connected to the DCC socket. The socket and any excess wire is then squeezed into the space behind the motor and the body is fitted on to the frame and the loco is closed. If the decoder shifts around, a gentle nudge with a plastic probe through the cab windows will push it back into position. Close the loco and reinstall the two screws. Remember that the black screw is towards the front of the loco and the silver one towards the rear.
I haven't connected the headlight yet - being too eager to see the engine running. You may want to check the loco before closing it. I did not do it and found that the loco just stood still or just move around in small jerks. I then had to open up the loco again to track down the problem. It turned out to be for a lot of reasons - none of them to do with the decoder installation.
The track I used to test it was just put together for the occasion and hadn't been used for a while. It was not as clean as it should be. Most of the track was Peco and part of it was an Atlas rerailer. The Peco track looked shiny enough but the Atlas track looked a little tarnished. A quick burnish with a wad of paper did not improve its appearance. I substituted more Peco track for it. This was enough to get the loco moving a little. The loco hadn't been used for a while and a bit of running made it go a little smoother. At low speeds the Lenz decoder seems to drive the loco in small spurts. This was a bit of a let down as I had got accustomed to the smooth starts and stops I got with the previous command control system I built. Still, these problems are minor and I expect the kinks to be straightened out with continued operation.
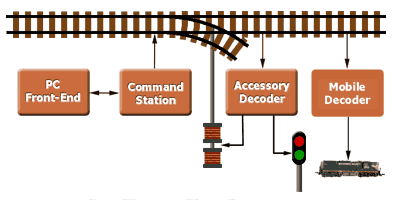
All in all it was a thrill to see that the whole contraption worked - the Visual Basic front-end program on my PC, the home made command station and the loco with the DCC decoder installed.
Here is a web site describing a home built DCC mobile decoder.


