
The command station is a PIC 16F876 based circuit which takes commands from a PC and outputs a DCC signal. The commands station has the following features. Now pay attention, 007...
Some manufacturers have their own command sets for a computer interface. I have chosen to use my own as the requirements for the command station were very basic - most of the work is expected to be done by the PC front-end. The command set for the command station is small.
How's that for a small command set? There are a couple of other commands which were in older versions and are not required any longer. These will be dropped.
The system is a minimum implementation with almost all logic being placed on the PC front-end program. The micro-controller used is the PIC 16F876. I used a PIC16C84 in the past. There were a few problems as the ideal timing for DCC pulses of 54us does not work very well for the serial port which ideally requires 51us. This is outside the DCC specs. To get around this you can use one of the newer PICs with a serial port. The PIC16F628 is a good replacement for the PIC16C84 as it has a serial port and is almost drop-in compatible. However, having invested in an ICE recently, I used a PIC16F876 which can be used with the ICE. It has a serial port and in a 28 pin skinny DIP has the smallest footprint in the 16F8XX family. It is available as a 20MHz part rather than the maximum of 10MHz with the 16F84. The part will be running at 20MHz and the serial port can now run at 9600 baud.
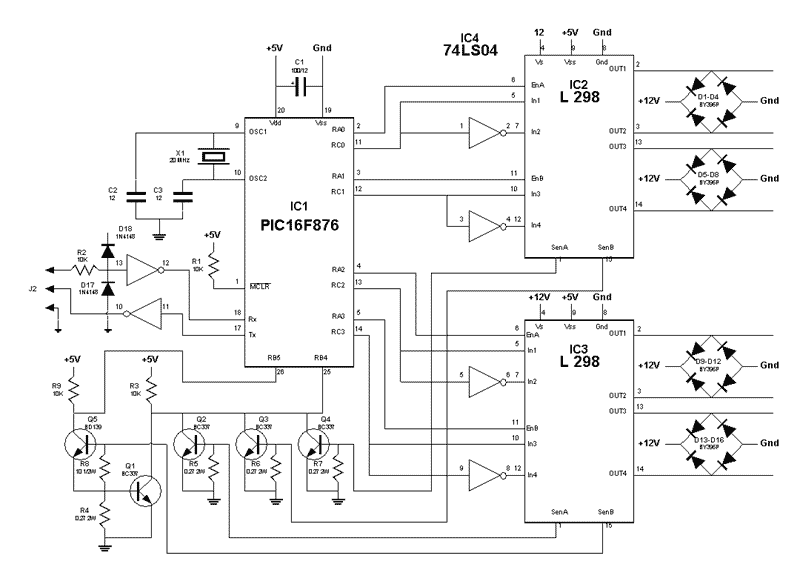
A 16C876 running at 20 MHz is used. It drives two L298 dual H-bridges through a few NOT gates. The diodes on the outputs protect the L298 outputs. The four transistors are driven by the sense outputs of the L298 and are used to sense a short circuit on any of the four tracks. The short circuit threshold is 1.8A. The outputs of the transistors are connected in a wired-or and go to one of the PIC input pins. The fifth transistor on the programming track detects the feedback pulse during programming and goes to another PIC input.
I have continued to avoid the use of an expensive MAX232 again. In the past, I had fed the serial line directly to the PIC16C84 and handled the signal inversion in software. This time I used the 2 spare inverters in the 74LS04.
There are quite a few choices for the H bridge driver. The LMD18200 is commonly used. I, however, opted for the L298 for two reasons - the L298 has two drivers against the single one on the LMD18200 and the L298 is a lot cheaper at AU$20 against AU$120 for two LMD18200 chips. So the L298 provides a compact and cheap solution. The LMD18200 has some advantages. It uses DMOS drivers and will have a smaller voltage drop(0.6V instead of 5V) and will consequently will have a much lower power dissipation(1.2W per driver instead of 10W). It can handle 3A instead of 2A with the L298.
The Timer0 on the PIC is set to interrupt every 58us. The ISR handles trasmission of the DCC packet on the rail outputs. The main routine consists of a loop of tasks. One of the tasks keeps the DCC packet transmission output buffer full at all times, providing idle packets when there is nothing else to transmit. Other tasks read commands received on the serial port and process them.
I designed and built a PCB for this circuit. The PCB is about 90x110 mm and is single sided. The PCB layout and the legend overlay are available as PDF files. The assembled PCB is shown in Pic 1.
| Pic 1 - Command Station PCB | Pic 2 - Assembled Case |
I picked up the case at the local electronics shop. It seems to be a case for an old 5 1/4" floppy drive. It is about 275mm(L) x 165(W) x 60mm(H). It has aluminium front and back plates. I used a toroidal transformer even though this is twice as expensive as a regular one as it has the required low profile. The transformer is rated at 18-0-18V 160VA. It is over-rated for the job but as it was the same cost as a 120 VA transformer, I ended up using it. The case and the contents are shown in Pic 2.
One of the important features yet to be added to the command station is programming. With my new N scale layout and the imminent arrival of 4 mobile decoders, this has been taken up in earnest.
The philosophy of the DCC command station has been to keep the complexity of the command station at the minimum and put as much complexity and flexibility on the front-end as possible. Incorporating service mode functions will follow the same guideline.
Implementing Service Mode and its various addressing modes are discussed in detail elsewhere. To recap, the two main addressing modes are Direct CV and Paged CV. Implement Paged CV and Physical Register and Address Only will come with it. Address Only is supposed to be the first one to be implemented but with the need for a page reset sequence it is far from the simplest. Perhaps, it is more of a marketing tool. Direct CV is the most powerful as it offers bit level access. As it does not need the page preset sequence, it is also the simplest. Interestingly, the RP sets a priority of Address Only, either of Physical Register and Paged CV, the other remaining mode and lastly Direct CV.
Although Direct CV is not the preferred programming method, it is used here as it is relatively straight forward and is best suited to the philosophy of simple command station and complex PC front-end. I am hoping that most modern decoders can handle this type - the Lenz LE077XF does.
The two major high-level functions to be implemented are writing to a CV and reading from a CV. Reading from a CV is implemented as making guesses at the value of a CV bit by bit using verify bit packet commands.
The only time-critical part in a packet sequence is sending out the entire reset packet-exec command-reset packet sequence without intervening idle packets. The command station will receive the single exec packet in the sequence. It will then transmit out the correct command sequence incorporating the given exec packet.
The read operation can be implemented completely on the front-end side. This is in keeping with the philosophy of smart PC-dumb command station. The write and verify commands can be unified by specifying the no. of times a packet has to be transmitted. This allows both writes and verifies to be done with the same command. The write packet sequence will be executed by sending the same write packet again as part of the decoder recovery cycle rather than the reset packet. This will also support any future enhancements to implement other addressing modes solely on the PC.
An existing command(P) was originally implemented to send out packets only on the programming track. This command will now be appropriated for service mode. The format of the P command will now be as follows.
Px nn nn nn<CR> |
||||
| Where | ||||
x |
-> |
No, of times the data packet is sent(6 for verify, 12 for write) | ||
nn nn |
-> |
The data packet | ||
Sending out the P command will do the following.
Writing to a CV is trivial once the above functionality is implemented on the command station. To implement a read, a series of data packets are sent out from the front-end doing a bit by bit verify of the CV. A 0 value verify is done first. A 1 value verify follows if no ack is received. If both verifies return no ack, the read is aborted with an error. This procedure is repeated till all bits have been determined. This approach builds the smarts into the front-end and keep the command station simple.
Implementing this on the command station requires the following changes made to the software


